2022.07.10 - [🍎 iOS/Architecture Pattern] - [Swift] MVVMC 자세히 알아보기 - 튜토리얼 1
2022.07.11 - [🍎 iOS/Architecture Pattern] - [Swift] MVVMC 자세히 알아보기 - 튜토리얼 2
해당 튜토리얼은 위 글과 이어집니다!
이전 포스팅 까지 보고 오셨다면 AppCoordinator에서 LanindCoordinator를 childCoordinator로 추가하면서 LandingViewController를 화면에 보여주는 것 까지 되어 있을거에요!
이번 포스팅에서는 view의 버튼을 눌러서 화면 전환하는 방법을 알아보겠습니다.

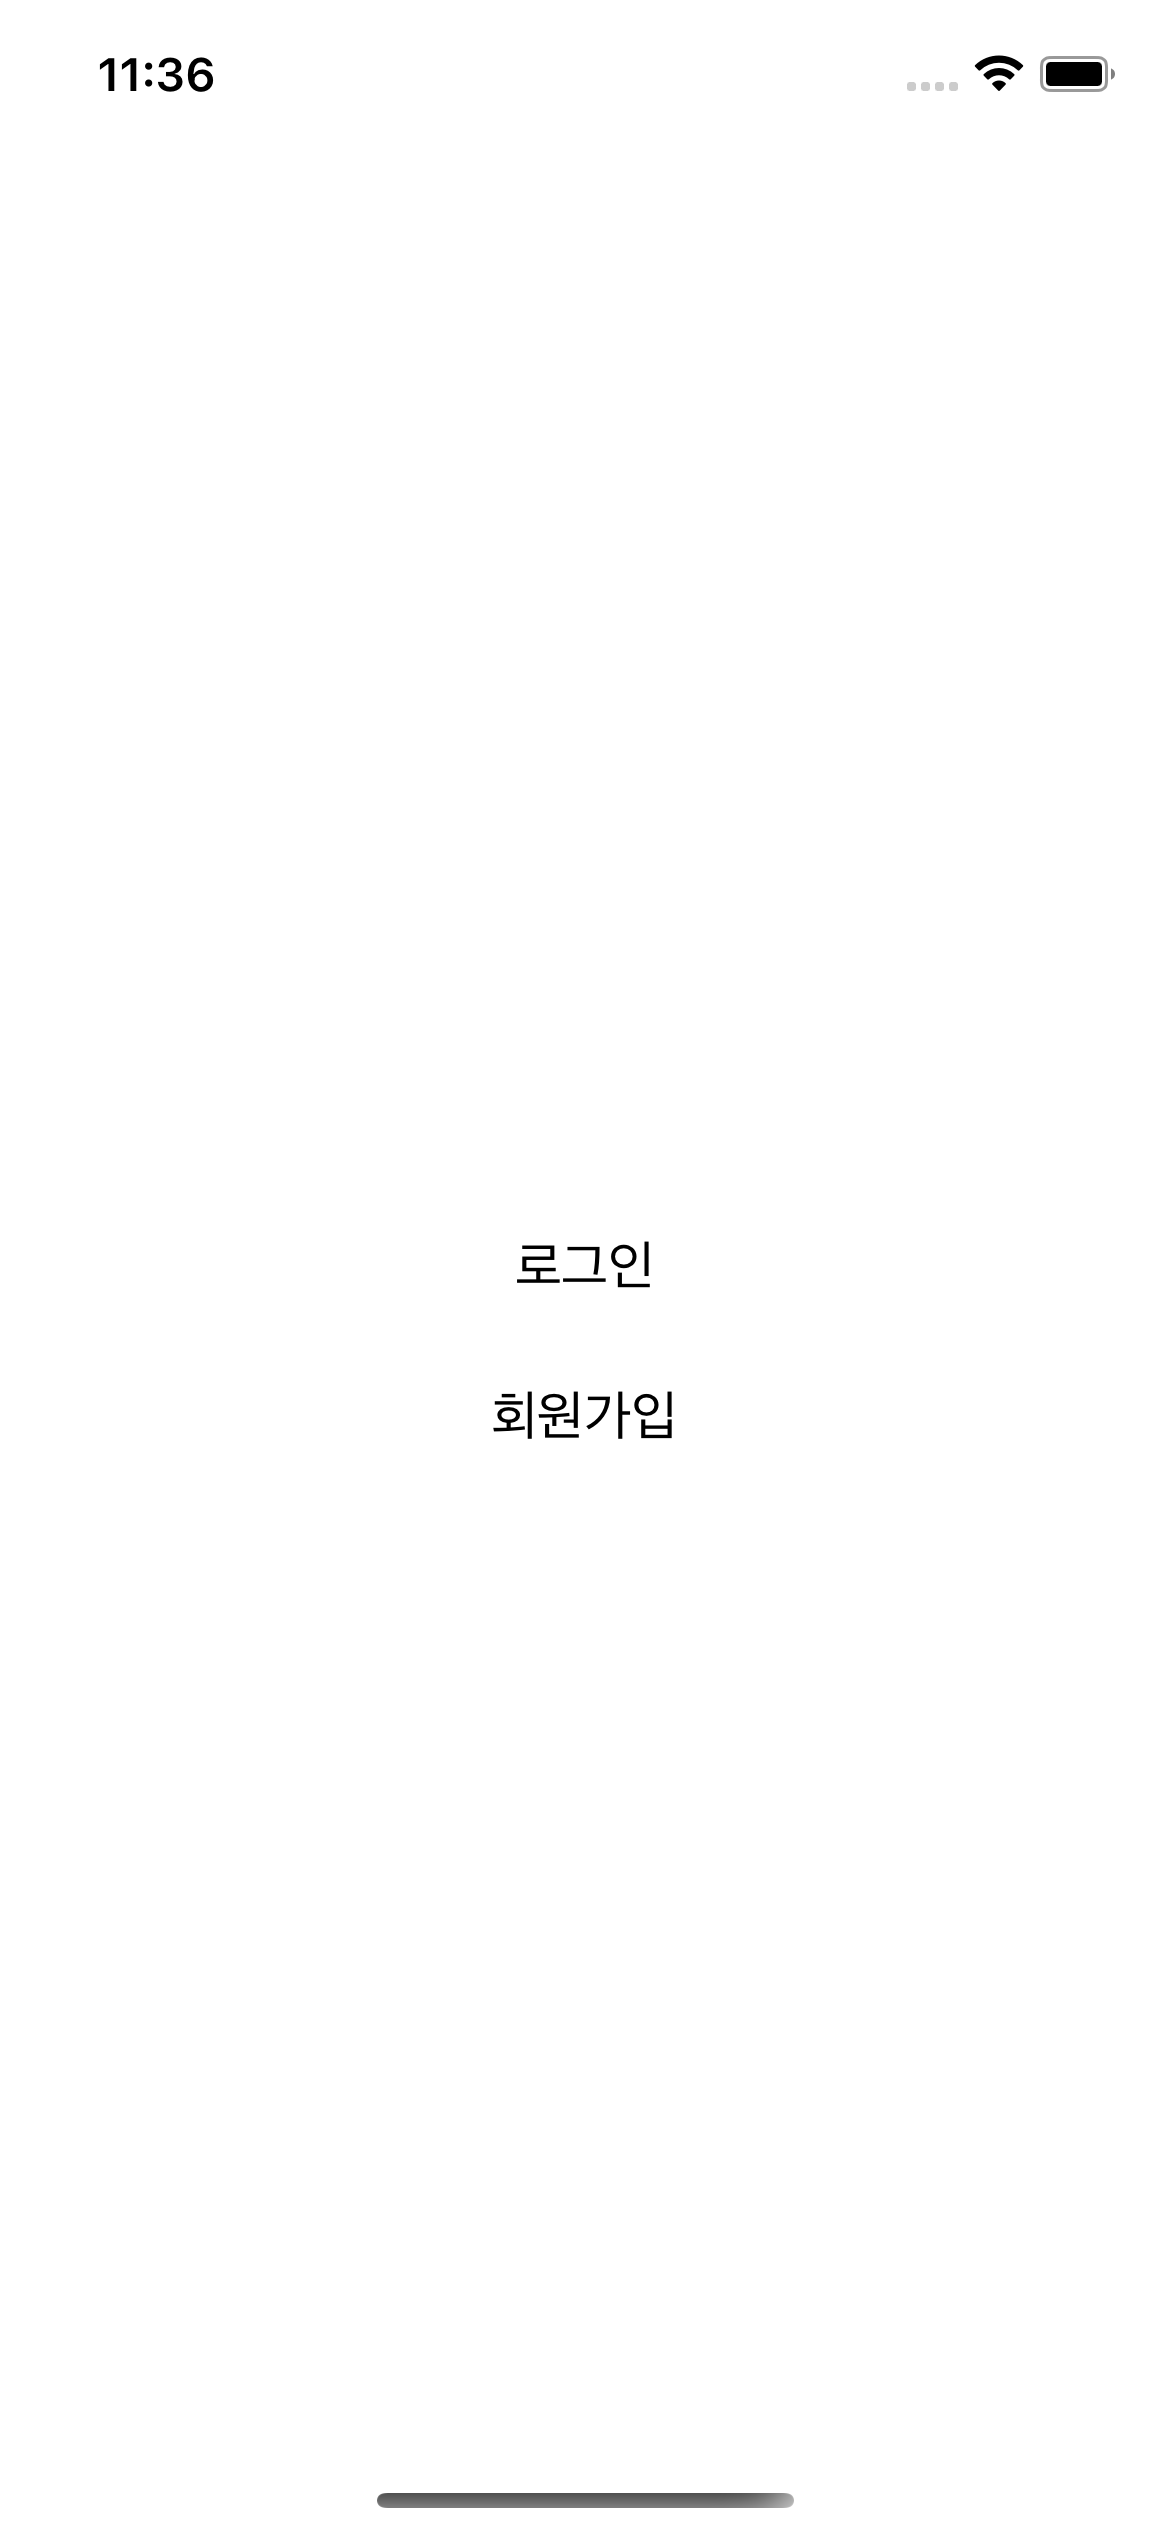
Landing 화면에서 Register(회원가입)과 Login(로그인) 화면으로 이동할 수 있다고 할 때 위 사진처럼 각각 RegisterCoordinator와 LoginCoordinator을 가질 수 있습니다. 지금은 프로젝트를 단순하게 구현했지만 Landing 화면도, 회원가입도 하나의 화면이 아닌 여러개의 화면을 가질 수 있습니다.
그래서 다른 Scene, 즉 새로운 하나의 화면 단위로 이동할 때 Coordinator을 생성하고 childCoordinator로 추가하여 화면 이동을 해주었습니다.
버튼 눌러 화면 전환하기
현재까지 구현한 화면을 보면 LandingViewController는 두 개의 버튼을 가집니다. 각각 로그인과 회원가입으로 이동하는 버튼이에요!
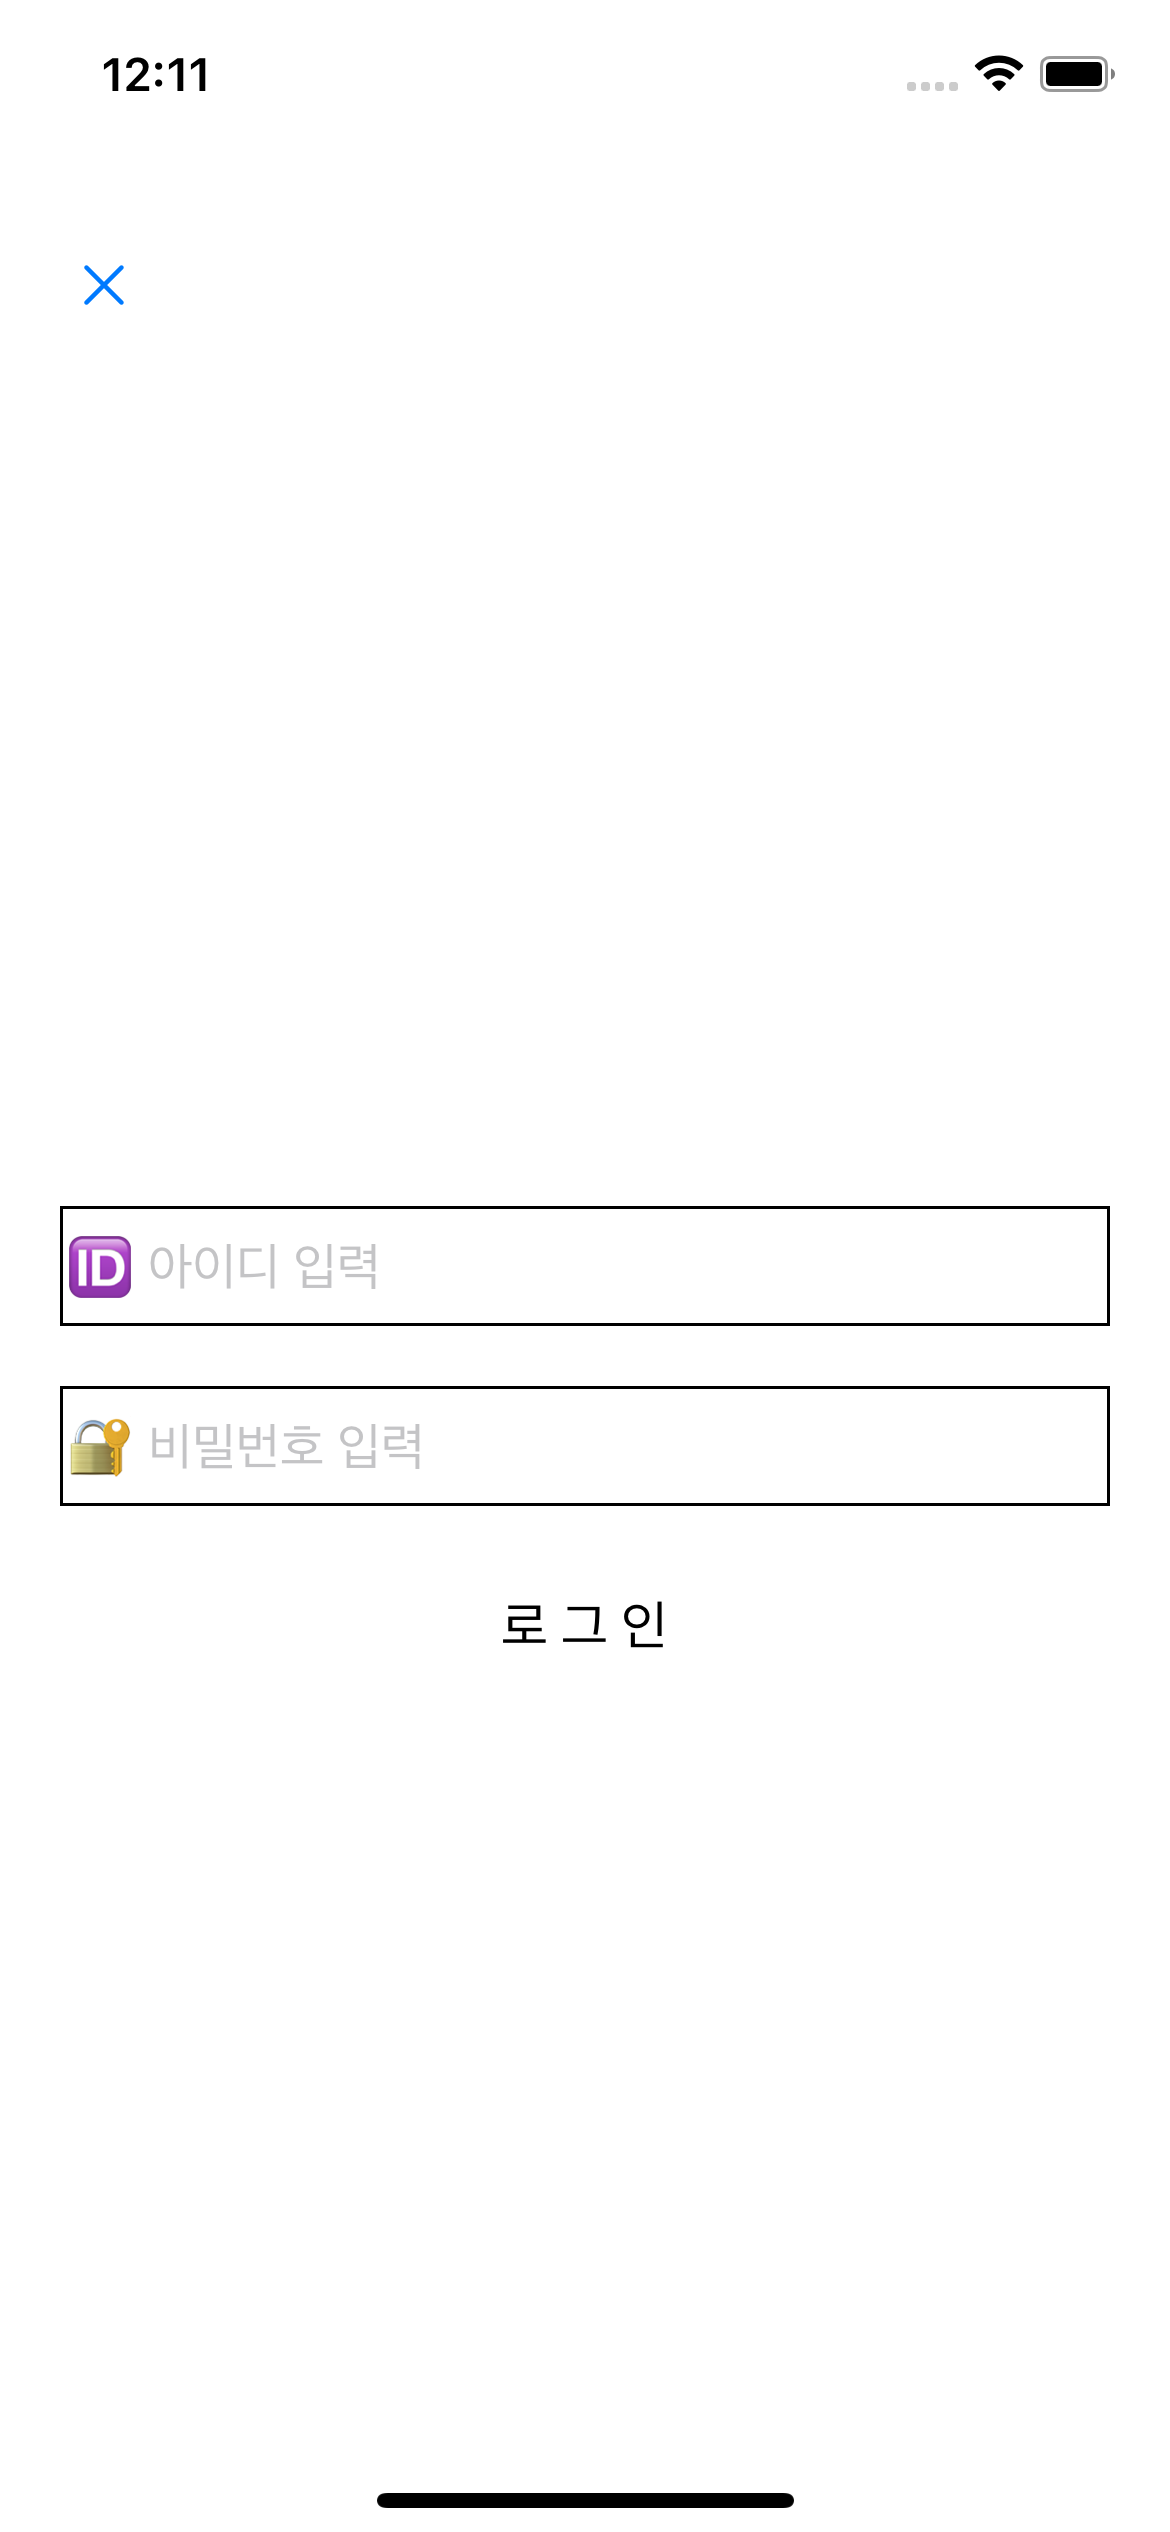
우선 로그인 화면을 그려줍시다. 로그인 화면은 아이디와 비밀번호를 입력할 수 있는 두 개의 텍스트 필드를 가지고 있어요
class LoginViewController: UIViewController {
    weak var viewModel: LoginViewModel?

    override func viewWillAppear(_ animated: Bool) {
        super.viewWillAppear(animated)
        navigationController?.isNavigationBarHidden = true
    }

    override func viewDidLoad() {
        super.viewDidLoad()
        view.backgroundColor = .white

        let closeButton = UIButton(frame: CGRect(x: 20, y: view.safeAreaInsets.top + 80, width: 30, height: 30))
        view.addSubview(closeButton)
        closeButton.setImage(UIImage(systemName: "xmark"), for: .normal)

        let idTextField = UITextField(frame: CGRect(x: 0, y: 0, width: UIScreen.main.bounds.width - 40, height: 40))
        view.addSubview(idTextField)
        idTextField.center = view.center
        idTextField.borderStyle = .line
        idTextField.placeholder = "🆔 아이디 입력"

        let pwTextField = UITextField(frame: CGRect(x: 20, y: idTextField.frame.origin.y + idTextField.frame.size.height + 20, width: UIScreen.main.bounds.width - 40, height: 40))
        view.addSubview(pwTextField)
        pwTextField.borderStyle = .line
        pwTextField.placeholder = "🔐 비밀번호 입력"


        let loginButton = UIButton(frame: CGRect(x: 20, y: pwTextField.frame.origin.y + pwTextField.frame.size.height + 20, width: UIScreen.main.bounds.width - 40, height: 40))
        view.addSubview(loginButton)
        loginButton.setTitleColor(.black, for: .normal)
        loginButton.setTitle("로 그 인", for: .normal)
    }
}
이제 LoginViewController의 비즈니스 로직을 처리할 LoginViewModel을 작성합니다. (이 튜토리얼은 뷰모델을 다루지 않지만 아키텍처 패턴의 형태와 디펜던시를 위해 작성해 주겠습니다. )
import Foundation

class LoginViewModel { }
비즈니스 로직을 구현하지 않아서 우선 Coordinator에서 디펜던시 전달을 위해 클래스 정의만 해둡니다.
이제 로그인과 관련된 모든 화면 전환을 관리하는 LoginCoordinagtor를 작성해 주겠습니다. LoginCoordinator.swift를 추가하고 Coordinator 프로토콜을 따르게 합니다.
class LoginCoordinator: Coordinator {
    var parentCoordinator: Coordinator?
    var childCoordinators = [Coordinator]()

    // 1
    let navigationController: UINavigationController
    var loginNavigationController: UINavigationController?
    let loginViewController = LoginViewController()

    // 2
    init(_ navigationController: UINavigationController) {
        self.navigationController = navigationController
    }

    // 3
    func start() {
        // 4
        let loginViewModel = LoginViewModel()
        loginViewController.viewModel = loginViewModel
        // 5
        loginNavigationController = UINavigationController(rootViewController: loginViewController)
        loginNavigationController?.modalPresentationStyle = .fullScreen
        guard let loginNavigationController = loginNavigationController else {
            return
        }
        // 6
        navigationController.present(loginNavigationController, animated: true)
    }
}- navigationControlelr는 LandingCoordinator에서 화면전환이 이루어지고 있는 navigationController 입니다. 로그인 플로우는 새로운 네비게이션 컨트롤러를 가지게 구현했습니다. loginNavigationController를 통해서 로그인과 관련된 화면 전환이 이루어집니다. 초기 화면인 loginViewController 도 생성합니다.
- init에서 LandingCoordinator의 navigationController를 받습니다. 이 navigationController에 로그인 navigationController를 띄우게 됩니다.
- Coordinator의 start()를 구현합니다.
- loginViewController의 dependency인 LoginViewModel을 생성하여 전달합니다.
- loginNavigationController의 rootViewController를 loginViewController로 생성합니다.
- LandinCoordinator로 부터 전달 받은 navigationController에 loginNavigationController를 present 합니다.
LoginCoordinator의 기본 구현이 끝났습니다. 이제 LandingCoordinator에서 LoginCoordinator로 이동할 수 있도록 코드를 작성하면 됩니다.
우선 LandingViewControlller로 이동합니다.
protocol LandingViewDelegate {
    func goToLogin()
}
LandingViewDelegate 프로토콜을 생성해 주세요!
MVVMC에서 View와 관련된건 ViewController가, 비즈니스 로직은 ViewModel이, 화면 전환과 dependency는 Coordinator가 담당하게 됩니다. 이때 UI에서 사용자가 버튼을 눌러서 "화면을 전환해줘" 라는 신호는 어디를 거쳐서 Coordinator로 전달 되어야 할까요?
사실 정해진 답은 아닙니다! 여러 글을 보며 참고 했을 때 viewModel에서 화면 전환을 처리하는 것도 있었고, UI에서 화면 전환을 처리하는 코드이니 바로 Coordinator로 전달해주는 코드도 있었습니다. 저는 후자를 사용해서 화면전환을 하려 합니다.
// 1
protocol LandingViewDelegate {
    func goToLogin()
}

class LandingViewController: UIViewController {
    weak var landingViewModel: LandingViewModel?
    // 2
    var viewDelegate: LandingViewDelegate?

    override func viewDidLoad() {
        super.viewDidLoad()

        view.backgroundColor = .white
        let loginButton = UIButton(frame: CGRect(x: 0, y: 0, width: 150, height: 30))
        view.addSubview(loginButton)
        loginButton.center = view.center
        loginButton.setTitleColor(.black, for: .normal)
        loginButton.setTitle("로그인", for: .normal)
        // 3
        loginButton.addTarget(self, action: #selector(goToLogin), for: .touchUpInside)
2. LandingViewController에 LandingViewDelegate 프로퍼티를 추가해 줍니다.
3. loginButton에 타겟을 추가해 줍니다.
    @objc func goToLogin() {
        viewDelegate?.goToLogin()
    }
LandingViewController에 로그인 버튼을 눌렀을 때 동작할 코드를 작성해 줍시다. LoginViewDelegate의 goToLogin을 호출합니다.
이제 이 프로토콜을 따르고 구현하기 위해 LandingCoordinator로 이동해 줍시다
extension LandingCoordinator: LandingViewDelegate {
    func goToLogin() {
        let loginCoordinator = LoginCoordinator(navigationController)
        loginCoordinator.parentCoordinator = self
        childCoordinators.append(loginCoordinator)
        loginCoordinator.start()
    }
}
LandingViewDelegate의 goToLogin()을 작성합니다.
loginCoordinator를 생성하고 현재 LandingCoordinator의 navigationController를 전달합니다. parentCoordinator와 childCoordinator의 관계를 설정해 준 뒤 loginCoordinator의 start()를 호출합니다.
이제 LandingCoordinator의 start()로 가서
    func start() {
        let landingViewModel = LandingViewModel()
        landingViewController.landingViewModel = landingViewModel
        // 1
        landingViewController.viewDelegate = self
        navigationController.pushViewController(landingViewController, animated: false)
    }
landingViewController가 생성되는 시점에 viewDelegate를 지정해 줍니다. 빌드하고 앱을 실행하면 아래와 같이 loginCoordinator로 이동하여 화면에 LoginViewController가 뜨는 것을 확인할 수 있어요!
다음 포스팅에서는 childCoordinators에 추가한 childCoordinator을 삭제하는 방법에 대해 포스팅 하겠습니다~
'🍎 iOS' 카테고리의 다른 글
| [Swift/iOS] UICollectionView layout 업데이트 (0) | 2022.08.20 |
|---|---|
| [iOS/Swift] UITableView Header 높이 업데이트 하기 (0) | 2022.08.17 |
| [Swift] MVVMC 자세히 알아보기 - 튜토리얼 2 (childCoordinator로 이동하기) (0) | 2022.07.11 |
| [Swift] MVVMC 자세히 알아보기 - 튜토리얼 1 (Coordinator와 AppCoordinator 구현하기) (0) | 2022.07.10 |
| [iOS/Swift] UIButton in iOS15 WWDC 정리 (0) | 2022.06.29 |


댓글